The short answer
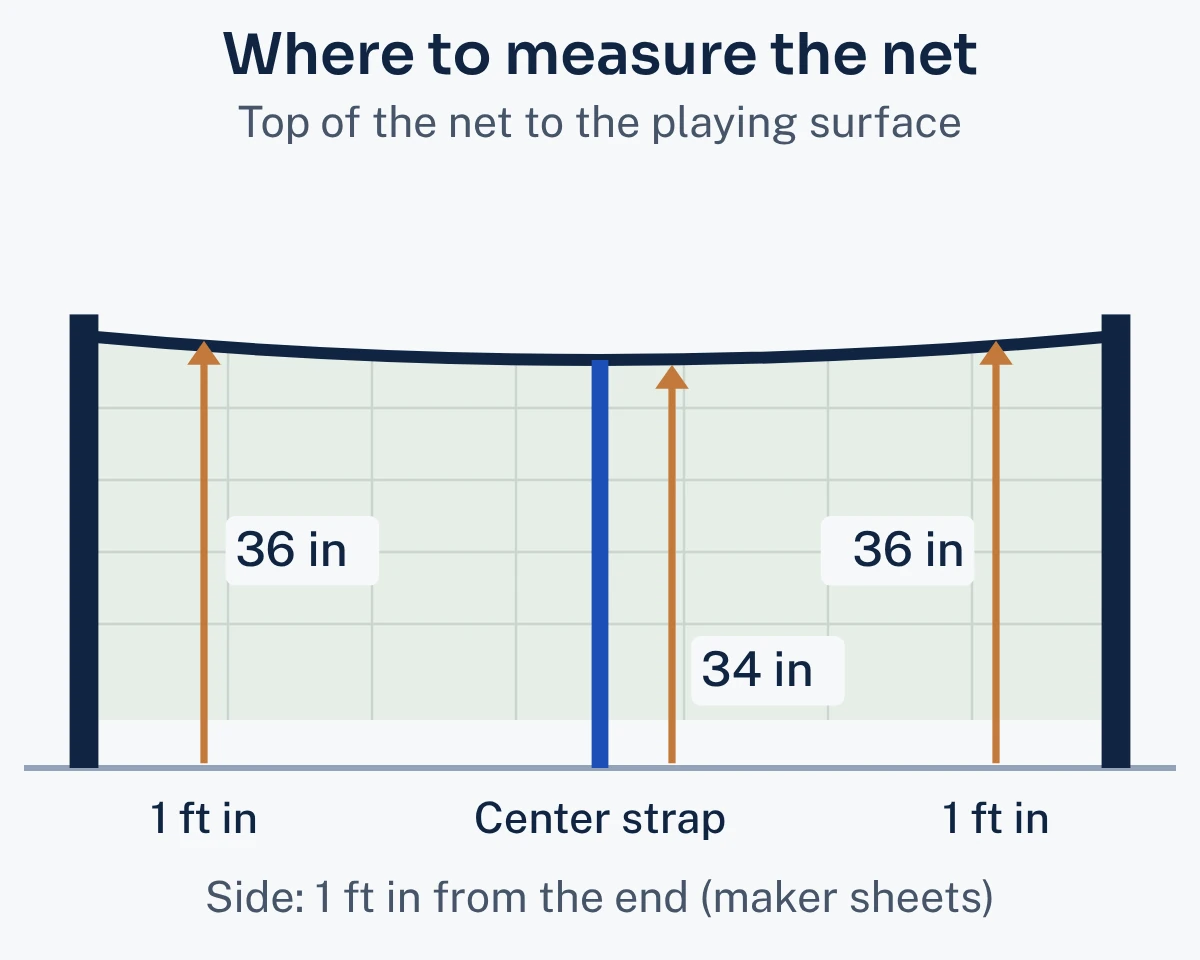
On a flat spot, build the base frame, slide the posts through the net’s end sleeves and stand them in the end bases. Fit the center rod or support, then tension the net with its end straps or cord. Check the height: 36 inches at the sidelines and 34 inches at the center, per USA Pickleball.
The order differs by frame: each type tensions the net and sets its center its own way. Each step comes from a named maker’s instructions; check it against the sheet in your box. We found no Monarch set-up sheet online: for a Monarch net, follow the sheet in its box. The tube-frame steps follow other makers’ sheets, not Monarch’s.
What you need
- The kit and its instructions. Dominator’s assembly guide says: “Read all instructions before assembly.”
- A flat, clear space. Dominator’s guide says: “Always assemble on a flat surface. Do not climb, sit, or hang on the net frame.” Franklin’s manual asks for a large clean area and notes that the finished net is about 22 feet long. Dominator’s set-up blog adds: “Avoid areas with obstacles or hazards, such as low-hanging branches or uneven ground.”
- A tape measure, and stakes on soft ground if your net takes them. Dominator’s blog lists “Measuring tape: This is essential for making sure your net is properly aligned.” and “Ground stakes: These aren’t required for every setup, just for grass or soft outdoor surfaces.”
- The tool in the box, if any. SwiftNet ships an Allen wrench; A11N lists “Labeled parts and no tools required for faster assembly” for its Core net.
Which kind of net frame do you have?
| Frame | Examples (maker) | How the net is tensioned | How the center height is set |
|---|---|---|---|
| Tube frame with end bases | PickleNet, Champion, Rally, Franklin, Dominator | Straps at each end, around the posts | A center rod in the net’s middle sleeve, with a Velcro strap around the center stand |
| Fold-out (accordion) frame | Srikel FlashCourt | The frame locks open with locking knob pins (Srikel); the net goes over it (bepickleballer) | A middle support rod (Srikel’s Amazon listing) |
| Carbon boom | SwiftNet 2.1 | A cord pulled down through a cam at the top of each post bends the boom | A center strap under the boom, to a red mark |
| Fixed posts | Douglas Premier XS posts | A cable cranked tight inside the post | An optional center strap |
How to set up a portable pickleball net, step by step
These steps follow the tube-frame sheets (PickleNet, Champion, Rally, Franklin, Dominator); part names differ by maker.
Lay out the parts and check them
Franklin’s manual for its Pickleball-X Official Net (item 52840) has you verify every part against its parts list first. Dominator’s blog says: “Before you start, check for damage.”
Place the end bases and the center stand
OnCourt OffCourt’s PickleNet sheet says: “Place 2 end bases approximately 22 feet apart.” Then: “Place center support midway between both end bases.”
Build the base frame
OnCourt OffCourt’s sheet, which puts this ahead of the placing in step 2, says: “Assemble the base frame first, working from one side to the other and fitting sections together as shown, making sure the parts are inserted fully into one another.” On the Rally net, Pickleball Central notes: “The Horizontal Bent Base Tube (#5) should be inserted with bent leg facing down to the ground.” Dominator’s guide warns about the joints: “Keep hands and fingers clear when connecting frame components or inserting locking pins.” Pickle-Ball, Inc.’s Champion sheet describes the result: “The lower frame assembly is now complete with the center of the frame raised off the ground.”
Slide the posts into the net and stand them in the bases
Pickleball Central’s Rally sheet says to put one post in its end base and “Slide one end of the net over the Vertical Post (#4) until the net sleeve is flush with the top of the Vertical Post.” Then thread the second post through the other end of the net and seat it in the other base. Dominator’s tip for that second post: “Slightly angle the second post for easier insertion.”
Fit the center rod
The Champion and Rally sheets both say: “Locate the white Tape Sleeve in the middle of the net and install the Center Thin Black Rod into the sleeve.” The rod then goes into the hole in the center stand, and you “Wrap the white Velcro strap (at bottom of mesh center) around the T-bar Stand (#1) to set the height of the net center.”
Tension the net
Pickleball Central’s Rally sheet says: “Route the Net Tension End Straps around each Vertical Post (#4) and tension the net.” OnCourt OffCourt says to “loop black adjustment straps through “D” ring and then back around pole to secure with Velcro at desired tension.”
Check the height and adjust
OnCourt OffCourt: “At one foot inwards from the end of the net on each side, the net height should be a regulation 36 inches. To adjust this height, simply slide the net sleeve up or down as needed.” The Champion sheet says: “Adjust the height by moving the top of the strap to the tape mark on the post.”
Test it before you play
Dominator’s guide says: “Follow all instructions carefully and ensure all hardware is securely tightened before use.” Its blog adds: “Give each pole a wiggle to make sure it’s stable.”
The net height to check
The 2026 USA Pickleball Official Rulebook sets the net heights as equipment specifications, rules 3.B.5 to 3.B.7:
Note
“Center Strap. A strap may be placed at the center of the net (centered 10 feet from the outside edge of the sidelines) to enable adjustment to the required center net height.” “Sideline Net Height. The top of the net must be 36 inches +/- 0.25 inch (91.44 cm +/- 0.635 cm) above the playing surface where the net crosses the outer edge of the sidelines.” “Center Net Height. The top of the net must be 34 inches +/- 0.25 inch (86.36 cm +/- 0.635 cm) above the playing surface at the center point of the court. If there is a center strap, the center net height measurement includes the center strap.”
Boom nets: how the SwiftNet goes up
On the SwiftNet 2.1, cords bend a carbon boom along the top down until it presses a center support onto the ground. Its maker’s sheet says the boom goes in with the net on the ground: “Please be very certain to only put the Tensioning Boom in the Netting when the Netting is lying flat on the ground. Never try to insert the Boom into the Netting Top End Caps with the Netting standing up.”
Set up the base stands
Push one post adapter into each base stand and tighten it with the Allen wrench supplied, per the SwiftNet sheet.
Unroll the net with the cords loose
“Make sure the Red or Black Net Tightening Cord that is on top of each Top End Cap, is loosened and free.”
Build the boom and fit it, net flat on the ground
“The Boom is put together just like a tent pole.” Slide each end under its cord and into the top end cap; the sheet notes the cords must sit above the boom “or otherwise the netting can get twisted.”
Stand the posts on the bases
Slide each post over its adapter until the knob engages the hole in the post.
Pull the cords down, then add the center support
Pull each cord down through the cam until “the center of the Boom is a few inches above the surface of the court,” clip the center support to the boom, and keep tensioning. The sheet cautions: “over-tensioning the top cord could cause one or both of the Base Stands to lift off the court making the system unstable. The ideal tension is the point just past where the Boom brings the Center Net Support firmly into contact with the court.”
Set the heights
Bring the center strap under the boom to the red mark, then measure and adjust “to achieve the needed 34” from the ground to the top of the center of the net.” At the ends: “Measure the height on either end of the Netting one foot in from the post.” If it reads slightly under 36 inches, the sheet says to swap in the taller base stand pads.
Fold-out frames: the Srikel FlashCourt
Srikel’s frame folds out in one piece. Srikel’s help page gives the set-up order as three headings: “Attach the Frame to the Base Feet”, “Expand the Frame” and “Attach the Net”. Srikel and Pickleheads disagree on doing it alone. Srikel’s product page says: “Push-Button System makes solo setup effortless.” Pickleheads says: “You’ll want a second pair of hands to pull it open. Technically, solo setup is possible, but unless you’ve got a sandbag and a stubborn streak, don’t bother. With two people, it’s assembled in less than a minute.”
For take-down, Srikel’s help page lists “Remove the Net”, “Collapse the Frame (Require 2 People)”, “Remove Snap Locks & Feet” and “Packing Everything into the Carry Bag”, with the caution: “Do not forcefully fold the frame”. On the locking pins it says: “When closing the net frame, please pull out the locking knob pins on both sides at the same time, then push the frame inward firmly to fold it back.”
How long does set-up take?
Times as each source states them. We have not timed any net.
| Net | Source | Stated set-up time |
|---|---|---|
| SwiftNet 2.1 | SwiftNet (maker) | “It can be set up in 3 minutes with only one person!” |
| SwiftNet 2.1 | Pickleheads (tester) | 1 minute 47 seconds, with a partner |
| Srikel FlashCourt | bepickleballer (tester) | “takes ~2 minutes to setup” (bepickleballer does not say which version it timed; its photos date from 2024) |
| Pickle-Ball 3.0 Tournament | Pickleball Central (brand owner) | “usually takes under eight minutes to assemble” |
| A11N Pro (wheeled, hand winch) | bepickleballer (tester) | “around 1 to 1.5 hours” |
Nets on permanent posts
On fixed posts, the net hangs from a cable that a crank in the post pulls tight. Douglas’s install sheet for its Premier XS pickleball posts sets out the order:
Stretch the net out and hook up the cable
Attach the cable’s loop to the hook on the non-winding (“dummy”) post. For the winding post, the sheet says: “Since the Premier is an internally wound post, cut off the loop at one end of the cable for the take up side.” It adds: “Leave some excess in order to allow for several turns around the internal mechanism.” Then the plain cable goes into the hole on the gear.
Crank the cable up
Turn the handle clockwise until the center of the net is about 36 inches. The sheet warns in capitals: “DO NOT OVERWIND.”
Put the dowels through the end tapes
The sheet says: “Insert dowels (provided) through the end side tapes.”
Lace the ends to the posts
through the net’s grommets with the cords supplied, keeping the cord tight.
Set the center with the strap
Douglas’s drawing labels it “Center Strap (purchased separately from net)”, shown “hooked to center anchor”; the sheet lists the center anchor as bought separately and says: “The center anchor should be 11’ away from each post.” Then: “Measure the depth of the net in the center and adjust the optional center strap to make the net 34” at the center line of the courts.”
Check the fit
“Your net should sit comfortable but somewhat taut between the net posts with a small gap between the net and posts.”
Setting the posts and the center anchor in concrete or ground sleeves follows the footing sizes on the sheet that comes with your posts.
Using a tennis net: the center strap and converters
The ITF’s 2026 Rules of Tennis set a tennis net’s center this way: “The height of the net shall be 3 feet (0.914 m) at the centre, where it shall be held down tightly by a strap.” That is 2 inches above pickleball’s 34-inch center (worked from the two rulebooks). Add-on converters pull the middle down instead. Advantage Tennis, which sells one, Convert-a-Net, says: “In as little as 2 minutes you can drop a tennis net to pickleball height without affecting the tennis cables or net straps.”
In an r/Pickleball thread from 24 September 2024, two commenters, each speaking only for themselves, warned against pulling a tennis net down. One wrote: “Please don’t pull down on the net!! This is not good for the net and over time causes the net to sag as the cable looses tension.” A reply in the thread from a deleted account said that an adjustable net should be loosened to lower it. A second said lowering and raising the net is fine, but that tie-down straps are more likely to stretch it and damage it. Not every court allows it: the original poster’s court “will not allow any adjustments to be made in terms of lowering the actual net.”
Taking the net down and storing it
- Release the tension first on a boom net. SwiftNet’s take-down safety note says: “Never try to remove the Boom from the Netting while it is under tension.” It adds: “Always be certain to fully release the Red or Black Tensioning Net Cord from both of the Top End Caps before attempting to take the net apart.”
- Fold the netting so it does not tangle. SwiftNet’s sheet: “The fan method makes the netting less likely to get tangled.”
- Take it down for bad weather. Dominator’s guide says: “Do not leave the net installed during strong winds or severe weather.”
- Fixed posts in the off-season. Douglas says: “During the off season, it is best to winterize your court by removing the posts and use sleeve plugs (sold seperately) to prevent moisture and dirt from falling in.”
Mistakes and troubleshooting
- The center sags. Srikel’s set-up guide names the cause as “Center strap not properly adjusted” and the fix as “Tighten the strap after side tension is set.”
- Posts lean or the height is uneven. Srikel’s guide says: “While portable nets are forgiving, uneven ground can cause leaning posts or inconsistent net height.” Its fix: “Re-seat connectors and reposition on flatter ground.”
- Poles will not click together. Dominator’s blog says: “Common issues include poles not clicking or unstable bases. If this happens, recheck the connections and confirm you’re using the correct parts.”
- A SwiftNet base lifts off the ground. The sheet puts this down to over-tensioning (step 5 above).
- The top tape flops over on a SwiftNet. The sheet traces this to a twisted cord; loosen the tension, untie the cord from its ring, take out the twist and retie it.
- Parts are missing or the sheet does not match your net. Ask the maker. Dominator’s guide says: “If you have questions about assembly or product use, our team is here to help.” Franklin’s manual lists a replacement-parts line.
Ready to buy?
Compare portable and wheeled nets in our pickleball net roundup, nets that pack into one carry bag in our portable pickleball net roundup, or see nets sold as a set in our pickleball net set roundup. For paddles and balls to play with, see our pickleball set roundup.
Frequently Asked Questions
Q. Should a pickleball net touch the ground?
USA Pickleball’s 2026 rulebook does not require it. Its size rule, 3.B.3, sets only a minimum net depth: “The net measurement from the bottom edge of the net to the top should be at least 30 inches (76.2 cm).”
Q. How far apart should pickleball net posts be?
Rule 3.B.2 of the 2026 rulebook says: “Net posts should be 22 feet +/- 1.0 inches (6.71 m) from the inside of one post to the inside of the other post.”
Q. Can one person set up a pickleball net?
It depends on the net. SwiftNet says one person can set up its net; Pickleheads advises a second person for the Srikel FlashCourt despite Srikel’s solo claim.
Q. Do you need tools to set up a pickleball net?
Often not. Dominator says its portable net is “designed for easy, tool-free setup on any flat surface.” SwiftNet supplies an Allen wrench for its base stands, and Douglas’s fixed posts come with a removable crank handle.
Sources (22)
- USA Pickleball, 2026 Official Rulebook
- OnCourt OffCourt, PickleNet instructions
- Pickle-Ball, Inc., Champion net instructions
- Pickleball Central, Rally net instructions
- SwiftNet, v2.1 instructions (hosted by Pickleball Central)
- Dominator, portable net assembly guide
- Dominator, portable net product page
- Dominator, set-up blog
- Franklin Sports, 52840 manual (Amazon-hosted copy; franklinsports.com did not load for us)
- SwiftNet, product page
- Pickleball Central, 3.0 Tournament net page
- A11N, Core 22 ft net page
- Srikel, FlashCourt net page
- Srikel FlashCourt listing on Amazon (ASIN B0F32FLDS5, seller Srikel; read as text, not linked), source of the “middle support rod” line
- Srikel, Help
- Srikel, set-up guide
- Douglas Sports, Premier XS post installation
- Pickleheads, portable net reviews
- ITF, 2026 Rules of Tennis
- Advantage Tennis, Convert-a-Net
- bepickleballer, portable net reviews (tester blog)
- r/Pickleball, adjusting a tennis net (forum thread)